

Spring Garden Preparation Tips: Your Guide to a Blooming Season
Spring is the perfect time to breathe new life into your garden and prepare for a season full of growth and beauty. As winter fades, you have the opportunity to get your garden ready for planting and ensure everything is in top shape for the coming months.

How can you make your garden thrive this spring? With a few simple steps and some careful planning, your garden will burst with color and vitality. From tidying up your tools to enriching the soil, spring preparation sets the stage for a successful and vibrant garden.
1) Test Soil pH

Knowing your soil’s pH is important for a healthy garden. Most plants do best in soil with a pH between 6.0 and 7.0.
To test your soil pH, you can use a soil testing kit or send a sample to a local extension service.
If the pH is too high or too low, add lime to raise it or sulfur to lower it. This adjustment helps your plants get the nutrients they need.
2) Prune Trees and Shrubs

Pruning your trees and shrubs in early spring helps promote healthy growth. For deciduous shade trees such as birch and maples, pruning should be done before new growth appears.
If you missed winter pruning, handle it promptly for trees and shrubs that bloom on new wood. Be cautious not to cut spring bloomers like azaleas and lilacs since they have already formed buds.
Use the best techniques for removing large branches. Small cuts should be made on the underside before fully cutting the branch. This prevents bark tearing.
3) Clean Garden Tools

Cleaning your garden tools is an essential step in preparing for spring.
Start by using a soft brush or cloth to remove loose dirt and mud from the tool head or blade. For stubborn spots, try using a stiffer brush or metal scraper.
To disinfect your tools, immerse them in a mixture of 1 part bleach to 9 parts water. This helps prevent diseases from spreading in your garden.
Don’t forget to lightly spray some penetrating oil on your tools. This keeps them in good shape and ready for use. Taking care of your gardening tools will make your work easier and protect your plants.
4) Compost Organic Waste

Composting organic waste is an excellent way to improve your garden. Start by setting up a compost bin or pile in a spot with some sunlight. Gather kitchen scraps like fruit peels and vegetable ends, along with yard waste such as leaves and grass clippings.
Aim to have about three times more brown materials (like leaves) than green materials (like vegetable scraps). Keep the pile moist but not too wet. Turn it regularly with a garden fork to help with decomposition and aeration.
Avoid adding meat, dairy, or diseased plants to your compost. This helps keep the pile healthy and effective. With time and care, you’ll produce rich compost to nourish your garden! For more tips, check out this beginner’s guide.
5) Plan Your Vegetable Garden
Start by deciding which vegetables you want to grow. Pick ones that you and your family enjoy eating.
Check the available space in your garden. Ensure you have sufficient sunlight and suitable soil conditions for your chosen plants.
Create a layout of where each vegetable will go. This will help in managing space and ensuring proper growth for each plant.
6) Start Seeds Indoors

Starting seeds indoors is a great way to get a head start on your garden. Begin by gathering your seeds and supplies. You’ll need pots, trays, and a seed starting mix.
Fill your pots or trays with the mix and sow your seeds. Make sure to label each one so you know what’s growing. Keep your seeds moist and warm for the best results.
Give your new seedlings plenty of light. Placing a small fan near your seedlings can help with airflow and prevent diseases.
For more detailed steps, you can check out The Beginner’s No-Fail Guide to Starting Seeds Indoors.
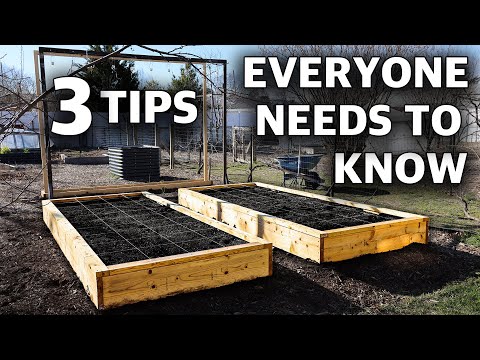
7) Install Raised Beds

Raised beds are an excellent way to start your garden. They provide better drainage and can improve soil quality.
First, choose a sunny spot in your yard. Assemble the raised bed frame and place it in your chosen area.
Fill the bed with a mix of soil and compost. This will ensure your plants have rich nutrients to grow.
Lay a layer or two of cardboard at the bottom to discourage weeds and invite earthworms.
8) Check Watering Systems

Make sure your irrigation system is ready for spring. Inspect all hoses and sprinklers for any damage or leaks. Replace or repair broken parts to avoid water waste.
Next, test the coverage of your sprinklers. Ensure that they reach all areas of your garden. Adjust them if needed for even watering.
Lastly, monitor the soil moisture. Overwatering and underwatering can harm your plants. Check the soil regularly to keep it at the right moisture level. For more tips, visit this guide on spring irrigation system prep.
9) Mulch Garden Beds

Mulching is a must-do for your spring garden. It helps retain moisture, suppress weeds, and improve soil health.
Add a layer of organic mulch like compost, straw, or bark chips. This will decompose over time, adding nutrients to your soil.
Make sure to spread the mulch evenly around your plants. Be careful not to smother them. This simple step can make a big difference in your garden’s health and appearance.
10) Edge Flower Borders

To edge your flower borders, start by marking your desired shape with a garden hose or string. This will help you visualize the final look.
Once your outline is set, use a garden spade to deepen the cut and remove turf. This creates a clean separation between the garden and the lawn.
Choose the right edging material. For a formal look, consider brick or stone. For a casual garden, wood or groundcover plants work well. Make sure each piece fits snugly together. This ensures a seamless and tidy appearance.
Soil Preparation
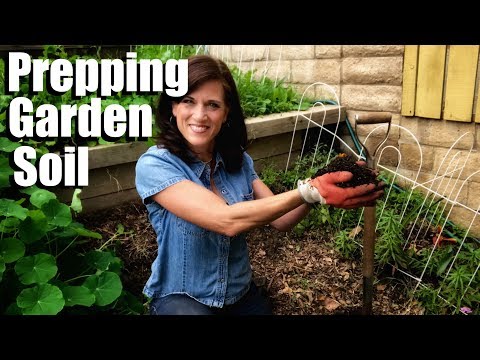
To get your garden ready for spring, start by focusing on the soil. Ensuring optimal pH levels, adding organic matter, and enriching the soil with nutrients are crucial steps for a fruitful garden.
Testing Soil pH
Testing soil pH helps you understand its suitability for growing plants. Most plants thrive in soil with a pH between 6 and 7. You can use a pH testing kit from a garden center or online store to check your soil’s acidity.
If your soil is too acidic (pH below 6), you can add lime to raise the pH. If it’s too alkaline (pH above 7), adding sulfur or peat moss can help lower it. Accurate pH levels ensure plants can absorb nutrients effectively leading to healthier growth.
Adding Organic Matter
Adding organic matter like compost, manure, or leaf mulch improves soil structure. This not only boosts nutrient content but also enhances soil aeration and water retention. Compost and aged manure are excellent choices because they break down slowly, providing a steady nutrient supply.
Mix organic matter into the top 6-8 inches of soil. This encourages root growth and ensures new plants have access to the nutrients they need. Adding organic matter also helps beneficial microbes and earthworms thrive, which further enhances soil quality.
Nutrient Enrichment
Enriching the soil with nutrients is essential for robust plant growth. Nitrogen, phosphorus, and potassium are key nutrients to add. You can use balanced fertilizers or specific composts that cater to the needs of your plants.
For nitrogen, consider green manures like clover or grass clippings. Bone meal or rock phosphate is great for adding phosphorus. For potassium, wood ash or potash can be used. Follow the recommended amounts on fertilizer packages to avoid over-fertilizing, which can harm plants. This careful enrichment will result in a productive and healthy garden.
Enhancing your soil following these steps will set a strong foundation for your spring garden.
Plant Selection

Choosing the right plants and placing them strategically can make your garden healthier and more productive. Focus on selecting suitable plants for your climate and explore companion planting to boost growth and reduce pests.
Choosing Suitable Plants
It’s important to choose plants that will thrive in your local climate. Check which hardiness zone you live in and pick plants rated for that zone. This ensures that your plants can withstand local temperatures, both hot and cold.
Look for plants that bloom or produce at different times. This helps keep your garden colorful and productive throughout the season. Always check the plant tags for sunlight and water needs. Group plants with similar requirements together.
When you buy plants from a nursery, inspect them closely. Avoid plants with yellowing leaves, weak stems, or visible pests. Healthy plants will have vibrant, firm leaves and strong, sturdy stems.
Companion Planting Tips
Companion planting involves growing certain plants together to benefit each other. Some plants help repel pests while others can attract beneficial insects. For example, marigolds can deter nematodes and aphids, making them a great companion for tomatoes.
Grouping plants with different root depths can also maximize space. Deep-rooted plants like carrots can grow well with shallow-rooted plants like lettuce. This way, they don’t compete for nutrients and water.
Consider aromatic herbs like basil and rosemary. These can improve the flavor of nearby vegetables and can also repel insects. Planting flowers such as nasturtiums and calendula can attract pollinators and other beneficial insects to your garden.
Use these strategies to create a healthy, thriving garden while minimizing pests and diseases naturally.


